ATSC 3.0 的消息愈來愈多, 在此整理一下. 首先補充 ATSC 2.0 發生了什麼事? 由於 2.0 的主旨只在於提升解析度, 因此還來不及推廣就被格局更大的 ATSC 3.0 取代了.
參考下圖 (取自 [2]), ATSC 3.0 除了可以走 broadcast (廣播), 也可以走 broadband (寬頻). Broadband 意味著可以用 USB 或是 HDMI dongle 透過 WIFI 路由器播放 ATSC 3.0 而不用換電視或是 tuner. 當然, 我們可以看到若走 broadcast 這路, 3.0 和 1.0 的差異甚大.
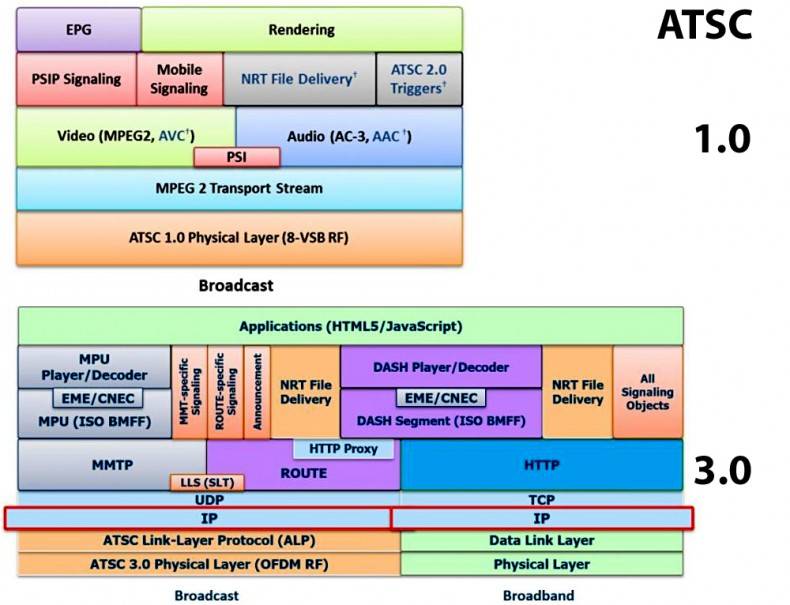
在 IP 層以上, broadband 和 broadcast 只有 TCP 和 UDP 的不同. 再往上, 就沒有分別了. 這裡有幾個縮寫要注意. ROUTE 不是路由器那個 route, 而是 Real-Time Object Delivery over Unidirectional Transport (那 E 呢? 去哪裡了?), MMTP 是指 MPEG Media Transport Protocol, HTTP 是 hypertext transfer protocol; 後兩者沒有搞怪, 就是大家平常知道的那個. 資料路徑如下:
MPEG-DASH –> IP –> ROUTE –> HTTP Proxy –> MPU (Media Processing Unit)
MPU 負責解碼 (decode) 和播放. 上圖的 MPU 兩層之中有個 EME, 負責解密 (decrypt) 的部分. 播放當中可能頭端還會推送一些資料, 它們會走上圖的 NRT (Non-Real-Time) file delivery. 基本的 ATSC 播放規格如下:
- Transfer rate: Up to 57 Megabits per second on a 6 MHz channel (up from ATSC 1.0 19.4 Mbit/s)
- Video Codec: HEVC/H.265 (ATSC 1.0 used MPEG-2)
- Progressive Video: Up to 4K UHD or 3840 X 2160 resolution at 120 FPS
- High Dynamic Range (HDR) imaging
- 3D TV compatible – just in case it makes a comeback
- Dolby AC-4 & MPEG-H 3D Audio
- Multi-audio track by program
- Dynamic range control
- Audio / video water mark
- Adaptable single frequency network transmission systems for improved over-air reception from ATSC 1.0
顯而易見地, 音視頻的水準都大幅提高了. 另外值得一提的是, ATSC 號稱改善了 AV sync. 對嘴的效果會比以前更好. ( ATSC improves lip-sync so that in any kind of delivery scenario lip-sync is maintained to a very tight tolerance.)
既然可以透過網路, 當然就可以支援手機播放 (multi-screen). 所有的內容都廣播出去之後, 接受者若在不同的區域收看, 就可以根據地理資訊 (如 GPS) 或個人喜好篩選其內容, 比方說天氣、交通資訊等等. 當然, 大家也可以對廣告投票, 反映自己的意見.
當然, broadcast 這路也不是什麼事都沒做. 據稱 ATSC 改善了訊號強度. 我想這一部分是 OFDM (Orthogonal frequency division multiplexing) 所貢獻的. 它的目標是像手機一樣在室內也可以收到訊號 ( allowing signals to travel further and to penetrate deeper into buildings and basements within range) [1].
最後提一下 ATSC 賺錢模式, 前面講到會播廣告. 但他們更想做的是 on line shopping, 看到電視上有什麼好東西都可以直接點下去就下單. 這個夢想在 BD (藍光光碟) 已經提過一次, 但 BD 不普及, 這想法就沒有發展成功. Netflix 的商業模式也被討論到 [1], 不過我對 Netflix 的模式除了包月之外, 認識不多.
[REF]
- http://www.audioholics.com/editorials/atsc-3.0-cord-cutter2019s-dream-to-tiered-internet-nightmare
- https://www.thebroadcastbridge.com/content/entry/6229/atsc-3.0-details-explained-part-4
- https://www.thebroadcastbridge.com/home/category/transmission-encoding-mux/entry/6139/atsc-3.0-mysteries-explained-part-1
- https://www.thebroadcastbridge.com/home/category/distribution-and-delivery/entry/6200/atsc-3.0-explained-part-2
- https://www.thebroadcastbridge.com/home/category/transmitters-and-rf-components/entry/6275/atsc-3-0-details-explained-part-3
 [REF]
[REF]
 那是有更多 bit ?也不是, 兩者都可以到 12 bit. 主要的差異是 BT. 2020 只定義了色域, 沒有定義 HDR 的 OTP (optical transfer function). 而 BT. 2100 明定了 HDR, 因此也有人說
